
Nano Server was a new install option that Microsoft introduced with Windows Server 2016. Nano Server was meant to provide Windows Server customers the ability to run Windows Server stripped down to its smallest footprint. There are some ways to create the Nano server Image. First, we can create it using Nano Server Image Builder. Second, Using PowerShell command. In this article, we will create a nano server image using PowerShell command.
Before we continue, you have to download the latest Windows Server 2016 ISO file. If you mount and open the Windows Server 2016 ISO file you can see a folder called “NanoServer”. This folder includes:
- NanoServer.wim – This is the Nano Server Image file
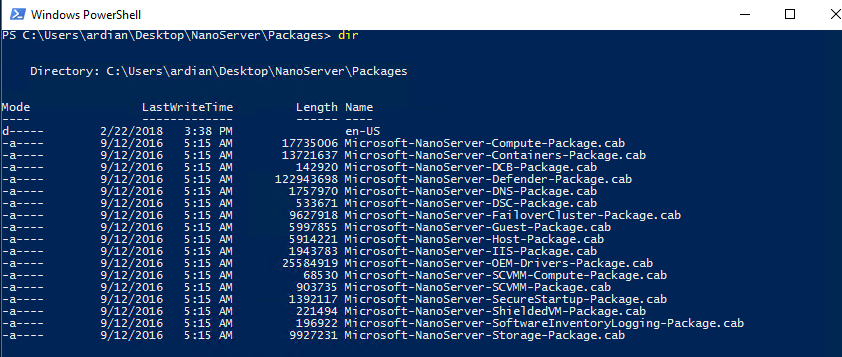
- Packages – The Package folder includes the Nano Server Packages, Windows Roles and Features and some basic drivers
- NanoServerImageGenerator – In this folder
, you can find the Nano Server Image Generator PowerShell Module
If you check on the Packages directory, you can find all the available packages for Nano Server.
You can run a command Get-Command -Module NanoServer* to check the available command from NanoServerImageGenerator Module.

We will use
# I've Copied the NanoServer directory from ISO Image to My Desktop
# Change Working Directory
cd C:\Users\ardian\Desktop\NanoServer\
# Import NanoServer Module
Import-Module .\NanoServerImageGenerator\NanoServerImageGenerator.psm1
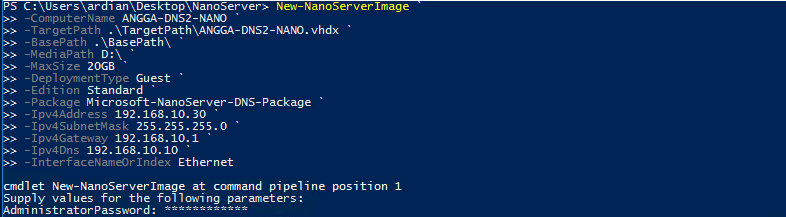
#Create a New NanoServer Image
New-NanoServerImage `
-ComputerName ANGGA-DNS1-NANO `
-TargetPath .\TargetPath\ANGGA-DNS1-NANO.vhdx `
-BasePath .\BasePath\ `
-MediaPath D:\ `
-MaxSize 20GB `
-DeploymentType Guest `
-Edition Standard `
-Package Microsoft-NanoServer-DNS-Package `
-Ipv4Address 192.168.10.30 `
-Ipv4SubnetMask 255.255.255.0 `
-Ipv4Gateway 192.168.10.1 `
-Ipv4Dns 192.168.10.10 `
-InterfaceNameOrIndex EthernetBelow is the explanation for the New-NanoServerImage parameter above:
- ComputerName adds the server name of the Nano Server
- TargetPath – Where the new Image file gets stored. You can create a .wim, .vhd or .vhdx file .vhd creates a Image for a Generation 1 VM (BIOS boot)
.vhdx create an Image for a Generation 2 VM (UEFI boot) - MediaPath – The location with the Windows Server 2016 files
- BasePath – Temporary folder to mount the WIM file
- MaxSize – changes the Partition size, if you are not using this parameter it will create a default partition of 4GB
- DeploymentType allows you to choose between Guest and Host
- Guest creates a Virtual Machine
- Host creates a Physical Image
- Edition can be Standard or Datacenter
- Package – Specifies an array of Nano Server packages to add. Packages are stored in the NanoServer\Packages folder on the installation media.
For the detail of the New-NanoServerImage cmdlet parameters can be found here.
After the process is finished, You can now copy the VHD/VHDX file from the Images folder